
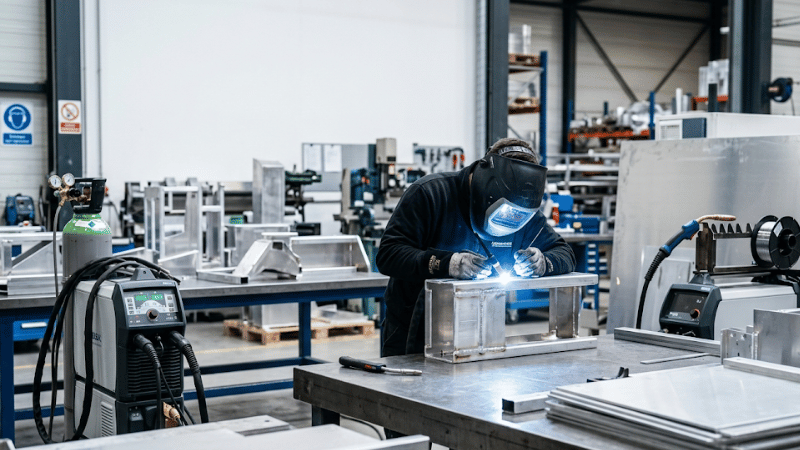
Aluminum welding looks easy—until the metal warps, burns through, or spits porosity like bad popcorn. The challenge is not the tool itself. It is heat behavior, surface chemistry, and process control.
This guide explains why aluminum welds fail or succeed, how TIG, MIG, and torch welding compare, and when automation or outsourcing makes more sense than fighting physics with optimism.
What Is Aluminum Welding?
Aluminum welding is the process of joining aluminum parts using heat, filler metal, and shielding gas or flame. Compared with steel, aluminum is more sensitive to contamination, heat input, and surface preparation.
It is widely used in automotive parts, aerospace structures, marine equipment, bicycle frames, machinery, enclosures, sheet metal fabrication, and custom prototypes.
Aluminum is popular because it is lightweight, corrosion-resistant, conductive, formable, and strong for its weight. That makes it ideal where manufacturers need lighter parts without turning the design into a wet noodle.
Why Aluminum Is Difficult to Weld
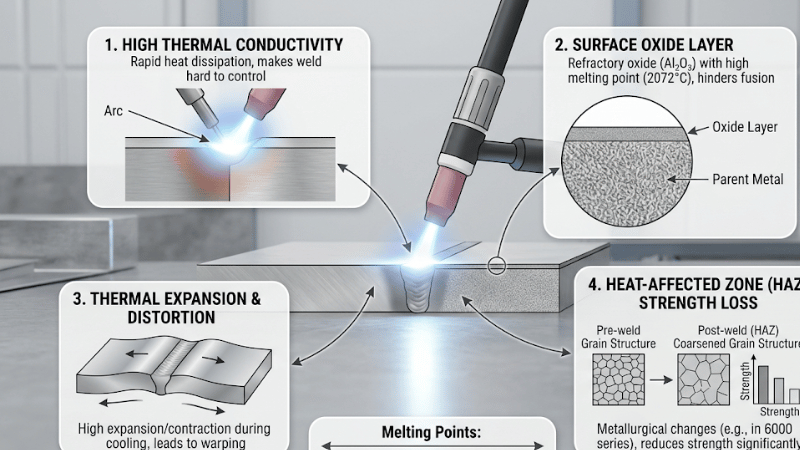
High Thermal Conductivity
Aluminum pulls heat away from the weld zone quickly. Thick parts may need higher heat for penetration, while thin parts can burn through suddenly.
That is why aluminum welding heat control matters so much. Too little heat causes lack of fusion; too much heat creates distortion, sagging, or holes.
Thermal Expansion and Distortion
Aluminum expands significantly when heated. During welding, uneven heating and cooling can cause warping, buckling, residual stress, and poor dimensional accuracy.
For precision assemblies, this is where “close enough” quietly becomes “scrap bin.”
Oxide Layer Problems
Aluminum naturally forms an oxide layer. The problem is that aluminum melts around 660°C, while aluminum oxide melts above 2,000°C. If that oxide is not removed, it can block fusion and cause contamination, porosity, and weak welds.
Clean surfaces, dedicated stainless steel brushes, and proper shielding are not optional. They are the entry fee.
Limited Temperature Feedback
Aluminum does not glow clearly before melting. Beginners often overheat the material before realizing the puddle is out of control.
This makes welding aluminum for beginners harder than welding many steels. Aluminum gives fewer warnings and fewer second chances.
Heat-Affected Zone Strength Loss
The heat-affected zone, or HAZ, is the area near the weld that is heated but not melted. During welding, this area may experience material property changes due to thermal exposure.
For heat-treated aluminum alloys such as many 6xxx series materials, welding can soften the HAZ. In other words, welding is not just joining—it is localized heat treatment.
Main Aluminum Welding Methods
TIG Welding Aluminum
TIG welding aluminum uses a tungsten electrode, shielding gas, and optional filler rod. It usually uses AC current to help clean the oxide layer while maintaining weld control.
TIG is best for thin materials, precision components, visible welds, and custom fabrication. It offers excellent control and clean weld quality.
Its limitations are speed, skill, and equipment cost. TIG is accurate, but it is not exactly in a hurry.
MIG Welding Aluminum
MIG welding aluminum uses a continuously fed wire electrode and shielding gas. It is faster than TIG and better suited for thicker materials, long welds, and production work.
Because aluminum wire is soft, feeding can be difficult. A spool gun or push-pull system is often needed to prevent wire-feeding problems.
MIG is easier to learn than TIG, but it is usually less precise and less attractive for fine visible welds.
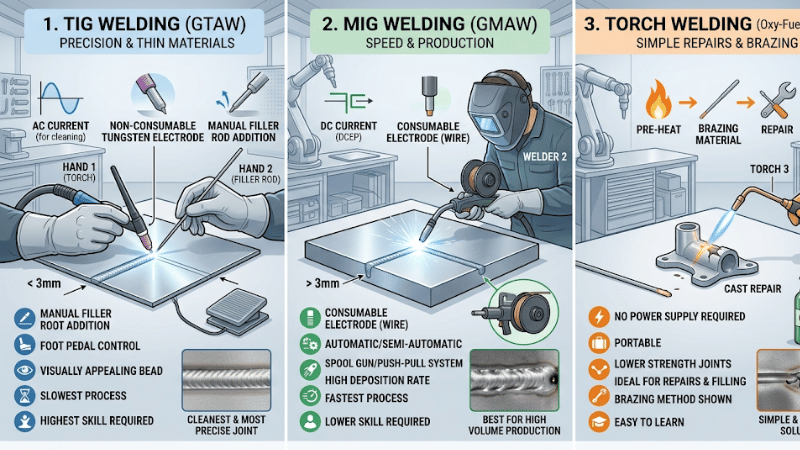
Aluminum Torch Welding
Aluminum torch welding uses flame, such as oxy-acetylene, to join aluminum. It can work for simple repairs or low-load applications where electric welding equipment is unavailable.
However, flame heat is broad and difficult to control. That increases distortion risk and makes results less consistent. For structural work, torch welding is usually the wrong tool for the job.
TIG vs MIG vs Torch Welding Aluminum
Expert Comparison: Aluminum Welding Methods
| Method | Typical Thickness | Weld Quality | Speed | Distortion Risk | Engineering Field Insight |
|---|---|---|---|---|---|
| TIG (GTAW) | 0.8mm – 6.0mm | Excellent | Slow | Low – Medium | Mandatory for high-precision 5mm panels (e.g. Shandong project) to prevent buckling. |
| MIG (GMAW) | 3.0mm – 25mm+ | Good | Fast | Medium | Risk of 70% volume surge (Austria project) if overwelding exceeds WPS by +2mm. |
| Torch | Repairs only | Variable | Slow | High | Heat buildup can surge by 25%+, causing total structural collapse in aluminum. |
Choose TIG when precision and appearance matter. Choose MIG when speed and productivity matter. Choose torch welding only for simple, non-critical applications.
Automation in Aluminum Welding
Manual welding depends on travel speed, torch angle, arc length, filler timing, and operator consistency. On aluminum, small variations can quickly create distortion, HAZ growth, and inconsistent weld quality.
Automated aluminum welding reduces those variables. Robotic systems provide consistent travel speed, stable torch positioning, repeatable arc control, and better process documentation.
Orbital welding is another option for pipes, tubes, and circular joints. It controls the weld path around the part, helping maintain uniform heat input.
The real value of automation is not just speed. It is precision heat control. When production volume is high, tolerances are tight, rework is costly, or parts are structural, automation can be the difference between repeatable quality and expensive guessing.
What Equipment Do You Need for Aluminum Welding?
For TIG, you need an AC TIG welder, tungsten, filler rods, shielding gas, and amperage control. For MIG, you need an aluminum-capable MIG welder plus a spool gun or push-pull system.
Pure argon is the standard shielding gas for most aluminum welding. Argon-helium mixes may be used for thicker sections that need deeper penetration.
Common filler metals include ER4043 and ER5356. ER4043 flows well and helps reduce cracking risk in many jobs. ER5356 can offer higher strength and better anodizing color match in suitable applications.
You also need dedicated cleaning tools: a stainless steel wire brush used only for aluminum, acetone or suitable solvent, clean cloths, gloves, helmet, protective clothing, and proper ventilation.
How to Weld Aluminum Step by Step
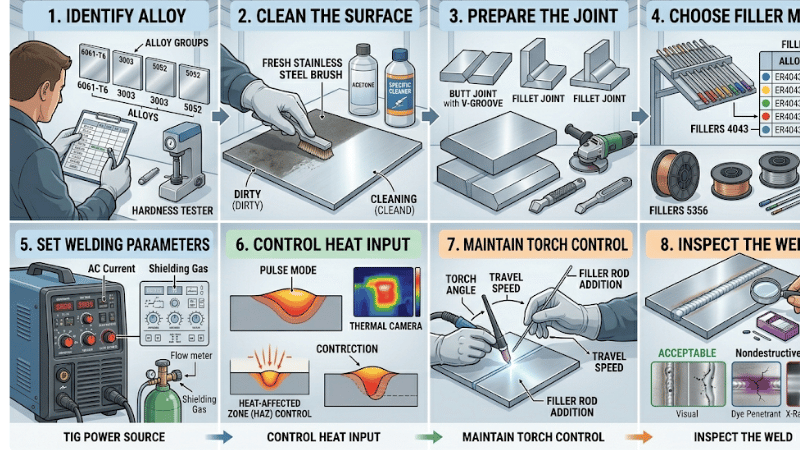
First, identify the alloy. Different aluminum grades have different weldability, cracking risks, and filler requirements.
Next, clean the surface thoroughly. Remove oil, dirt, moisture, and oxide. This helps prevent aluminum weld porosity, contamination, and lack of fusion.
Then prepare the joint with proper fit-up and clamping. Good preparation reduces gaps, overheating, and distortion.
Choose the correct filler based on base material, strength needs, service environment, and finishing requirements. The wrong filler can cause cracking, poor strength, or ugly finishing results.
Set proper parameters for amperage, voltage, wire feed speed, AC balance, travel speed, and gas flow. Correct settings control penetration, bead shape, and heat input.
During welding, maintain steady movement and torch control. Keep the arc length, angle, and travel speed consistent. Finally, inspect the weld for porosity, cracking, undercut, lack of fusion, distortion, and dimensional accuracy.
Common Aluminum Welding Mistakes
Most aluminum welding mistakes come from poor cleaning, wrong filler selection, excessive heat, slow travel speed, weak shielding gas coverage, or poor fixturing.
Poor cleaning causes porosity. Wrong filler can cause cracking. Excessive heat creates distortion and HAZ growth. Weak fixturing lets parts move when they should stay put.
In short, aluminum rarely fails randomly. It usually fails because the process was not controlled tightly enough.
Aluminum Welding Troubleshooting
Porosity usually comes from contamination, moisture, oxide, or poor shielding gas. Improve cleaning, check gas flow, inspect hoses, and block drafts.
Cracking may result from wrong filler, poor alloy selection, excessive restraint, or improper heat input. Fix it with better material matching, joint design, and heat control.
Burn-through happens when heat input is too high for thin material. Reduce amperage or voltage, increase travel speed, or use backing support.
Lack of fusion often comes from insufficient heat, poor oxide removal, or bad joint prep. Clean better, adjust parameters, and verify proper puddle tie-in.
Distortion comes from uneven heat input. Use fixtures, balanced welding sequences, tack welds, chill bars, or automation for better consistency.
Aluminum Welding Tips for Beginners
Start with thicker material. Thin aluminum punishes slow reactions and shaky technique.
Clean everything carefully, use dedicated aluminum tools, and focus on heat control before worrying about Instagram-worthy beads.
MIG is usually easier for beginners on thicker material. TIG is better for precision but requires more coordination, patience, and practice.
Can You Weld Aluminum at Home?
Yes, you can weld aluminum at home with the right setup. A MIG welder with a spool gun is often the easiest starting point, while TIG is better for precision work.
Home welding is suitable for non-critical brackets, hobby parts, prototypes, and simple repairs.
Avoid DIY welding for safety-critical, load-bearing, pressure-containing, or high-precision parts. Vehicle suspension parts, lifting equipment, pressure vessels, and structural assemblies deserve professional handling.
When Should You Outsource Aluminum Welding?
Outsource aluminum welding when parts are structural, tolerance-critical, made from challenging alloys, produced in batches, or expensive to rework.
Professional welding shops offer procedure control, proper fixturing, inspection, qualified welders, and sometimes robotic welding systems. That can reduce scrap, delays, warranty issues, and production headaches.
DIY is fine for learning and low-risk projects. Industrial parts need more than courage and a clean YouTube history.
FAQs About Aluminum Welding
1. What is the best method for aluminum welding?
TIG is best for precision, thin materials, and visible welds. MIG is better for thicker materials, long welds, and production work. The right choice depends on thickness, tolerance, appearance, and volume.
2. Is aluminum harder to weld than steel?
Yes. Aluminum conducts heat quickly, forms a high-melting oxide layer, expands significantly, and gives little visual warning before melting.
3. Why does aluminum warp during welding?
Aluminum warps because welding creates uneven heating and cooling. The hot area expands, then contracts, pulling the part out of shape.
4. Does welding weaken aluminum?
It can. Welding may soften the heat-affected zone, especially in heat-treated alloys such as many 6xxx series materials. Proper heat control and filler selection are essential.
Conclusion
Aluminum welding is challenging because aluminum conducts heat quickly, expands aggressively, hides temperature changes, and forms a tough oxide layer. Successful welding depends on cleaning, filler selection, heat control, distortion control, and HAZ management.
TIG is best for precision, MIG is best for productivity, and torch welding is limited to simple repairs. For high-volume, tight-tolerance, or structural applications, automation or professional welding support is often the smarter investment.
Need Aluminum Welds That Stay Strong and On Spec?
When your aluminum parts need tight tolerances, clean welds, and fewer distortion problems, working with an experienced fabrication partner makes all the difference. The right team can optimize joint design, filler selection, fixturing, welding process, and inspection.
Contact us today to discuss your aluminum welding project and get a reliable manufacturing solution built around quality, performance, and cost control.