Stainless steel is corrosion resistant, not corrosion proof. Machining, welding, handling, and embedded iron can all weaken surface performance and lead to rust complaints.
This guide explains the stainless steel passivation process in plain English, including the chemistry, standards, weld-related pitfalls, and verification methods many competitor articles skip.
What Is Passivation of Stainless Steel?
Passivation is a controlled chemical treatment that removes free iron and surface contamination so stainless steel can better maintain its protective chromium-rich oxide layer. ASTM A967 covers chemical passivation methods and acceptance tests, while AMS 2700 defines process requirements for corrosion-resistant steels.
At the surface level, passivation is not a coating, plating, or polish. It improves corrosion resistance by removing contamination that interferes with the stainless surface.
That also means passivation does not remove heavy oxides, weld scale, or heat tint by itself. If those remain, the part may still underperform in service.
Why Stainless Steel Needs Passivation
Free iron contamination happens more often than shops like to admit. Machining, forming, blasting, shared tooling, and handling can transfer iron to the surface. Once that happens, rust can appear even when the alloy itself is correct.
Stainless steel corrosion prevention becomes especially important after fabrication because processing can disturb surface chemistry and introduce contaminants. Welded parts need extra attention because the heat-affected zone may contain oxide layers and reduced corrosion resistance.
That is why passivation is common in medical, food processing, aerospace, semiconductor, and industrial equipment applications, where cleanliness and reliability are not optional.
How the Stainless Steel Passivation Process Works
Many articles treat passivation like fancy cleaning. It is more specific than that. The acid chemistry removes free iron contamination and leaves a cleaner, more chromium-rich surface.
A simplified citric-acid reaction is often written as:
In simple terms, the chemistry helps dissolve or complex surface iron so the passive film can rebuild more effectively.
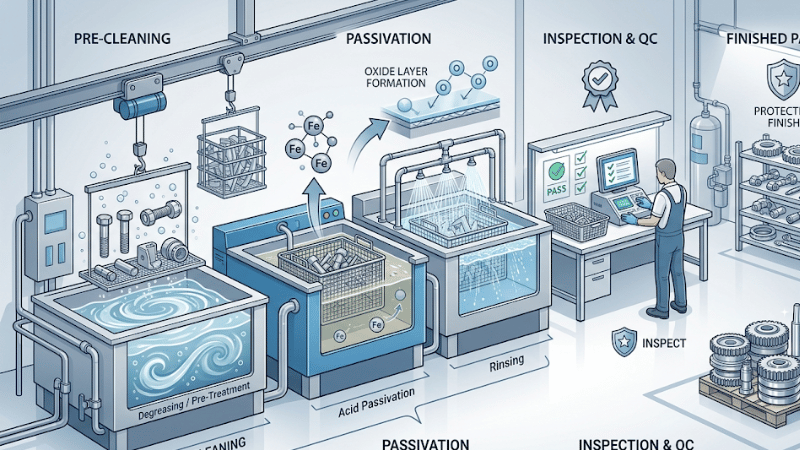
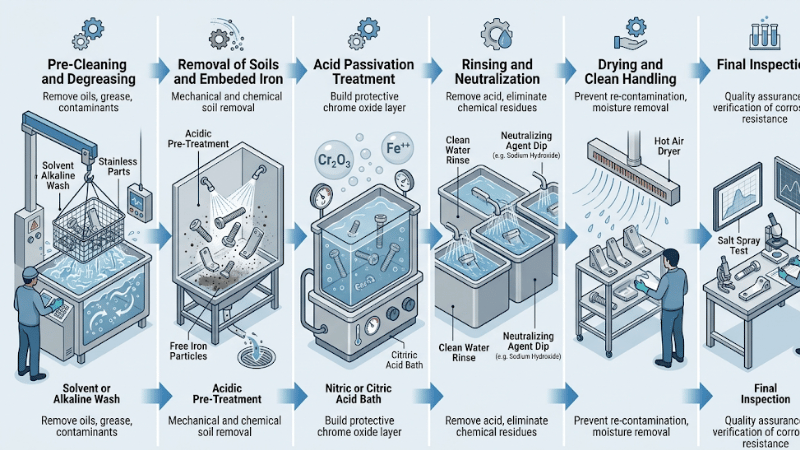
The usual sequence is straightforward:
1. Pre-cleaning and degreasing
Oils, coolants, and shop residues must be removed first. Otherwise the acid cannot reach the contamination.
2. Removal of soils and embedded iron
This step targets transferred iron and residual shop contamination before they become corrosion sites.
3. Acid passivation treatment
Parts are treated in a controlled nitric or citric acid passivation bath based on the alloy, contamination type, specification, and production needs.
4. Rinsing and neutralization
Poor rinsing can compromise otherwise good results. Water quality matters, especially for complex parts.
5. Drying, handling, and packaging
Freshly treated parts can be recontaminated by dirty gloves, racks, or packaging.
6. Inspection and verification
Appearance helps, but testing and records matter more.
Process results depend on alloy grade, bath chemistry, temperature, immersion time, water quality, and post-treatment handling.
Nitric vs Citric Acid Passivation
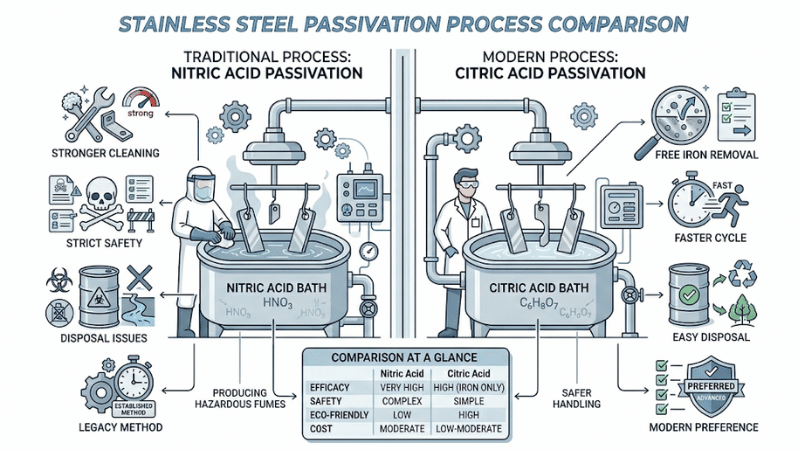
Nitric acid passivation is the traditional option. It is widely recognized and still common where legacy customer requirements or older process specifications apply.
Citric acid passivation has gained ground because it is effective for free iron removal and often offers easier handling and waste management.
In practice, neither chemistry is universally better. The right choice depends on contamination type, part geometry, specification requirements, disposal capability, and customer approvals. Nitric may fit legacy programs, while citric often works well for modern production environments seeking simpler environmental management.
The Pickling-Passivation Gap: What Happens After Welding
This is one of the biggest blind spots in passivation content.
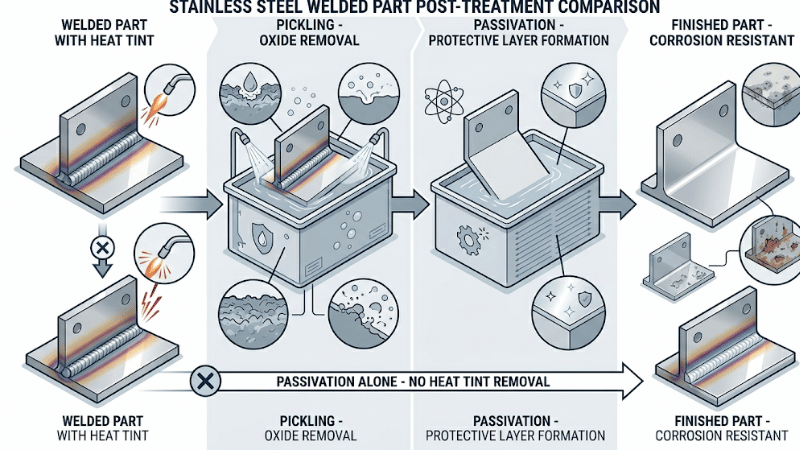
Heat tint is an oxide layer formed during welding. It reduces corrosion performance compared with the parent material, especially in demanding environments.
Here is the key point: passivation cannot remove weld heat tint by itself. If heavy oxides remain in the heat-affected zone, the part may be passivated on paper but still vulnerable in service.
For many welded parts, pickling or another suitable oxide-removal method must come before passivation. A practical workflow is simple: inspect the weld area, remove heat tint and scale, clean thoroughly, passivate, then verify the final surface condition.
When to Passivate Stainless Steel in the Workflow
Passivation usually belongs after machining or fabrication, after welding and heat tint removal if needed, and before final assembly or shipment. Parts may also need retreatment after maintenance or rework.
A realistic sequence is: fabricate, weld if needed, remove heat tint or scale, clean, passivate, verify, protect, and ship. Put how to passivate stainless steel too early in the workflow and later operations may simply recontaminate the part.
How to Tell If Stainless Steel Has Been Properly Passivated
Visual appearance alone is not enough. A part can look clean and still fail in service.
Proper verification relies on applicable tests, process records, and traceability. ASTM A967 includes multiple acceptance-test options depending on the method and application.
For buyers and QA teams, the right questions are practical: Which standard was used? Was welding involved? How was heat tint removed? What test verified the result? What documentation ships with the lot?
Standards, Specifications, and Compliance Requirements
The most cited standards are ASTM A967, AMS 2700, and ASTM A380. ASTM A967 covers passivation methods and testing, AMS 2700 is widely used in engineered applications, and ASTM A380 is valuable for cleaning, descaling, and passivating stainless parts.
For post-weld treatment and corrosion effects of heat tint, BSSA guidance is also useful.
On drawings and purchase orders, specify the standard, chemistry if relevant, required verification test, documentation needs, and whether welded areas must be descaled before passivation.
Common Passivation Mistakes and How to Avoid Them
The most common mistakes are predictable: confusing passivation with cleaning, skipping pre-cleaning, trying to passivate over weld discoloration, choosing the wrong chemistry, or recontaminating parts after treatment.
The fix is disciplined process control. Define the surface condition before treatment, match the chemistry to the contamination, control rinsing and handling, and verify with testing and records. That is why ASTM passivation standards matter.
In-House or Outside Vendor?
In-house passivation can work when production volume is stable, part families are consistent, waste handling is under control, and the team can manage testing, documentation, and contamination control.
Outsourcing often makes more sense when geometry is complex, certification matters, cleanliness requirements are strict, or the cost of failure is high. Hidden in-house costs often include waste treatment, training, water-quality control, fixturing, and retesting.
As a rule, if your parts are welded, highly specified, or expensive to remake, an experienced outside vendor is often the safer choice.
Real-World Notes from Corrosion Troubleshooting
In production, “stainless steel rusting” is usually not caused by mysterious metallurgy. More often, it comes from transferred iron, leftover heat tint, weak cleaning, poor handling, or vague specifications.
The lesson is simple: a good alloy can still fail with a bad surface. Shops that treat free iron removal and weld-area preparation as process-critical tend to get fewer complaints and more repeatable quality.
FAQs
What is passivation of stainless steel?
Passivation is a controlled chemical treatment that removes free iron and surface contaminants so stainless steel can better maintain its natural corrosion-resistant oxide layer.
Can passivation remove weld discoloration or heat tint?
No. Passivation does not effectively remove heat tint on its own, so welded parts usually need pickling or another oxide-removal step first.
How do you know if stainless steel has been properly passivated?
Proper passivation is confirmed through process records, applicable specifications, and verification tests rather than visual appearance alone.
Is citric acid passivation better than nitric acid passivation?
Not always. Citric often offers easier handling and a friendlier environmental profile, while nitric may still be preferred for legacy specifications or approved customer processes.
Conclusion
Passivation of stainless steel is a controlled chemical treatment, not a coating and not a cosmetic add-on. Its main function is to remove free iron contamination so the stainless surface can better maintain corrosion resistance.
The biggest practical takeaway is that welded parts often need more than passivation alone. If heat tint or heavy oxides remain, the right sequence may require pickling first and passivation second. Clear specifications, verification, and disciplined handling help prevent corrosion failures.
Need Help Specifying Stainless Steel Passivation?
Choosing the right stainless steel passivation process should not feel like solving a chemistry problem during a production crisis. An experienced finishing partner can help match the process to the alloy, weld condition, cleanliness target, and documentation requirements.
Contact us today to review your parts, drawings, and corrosion requirements. We will help you choose the right treatment path, test method, and production workflow with greater confidence.