
Welding positions aren’t “theoretical classroom stuff.” They’re the difference between a smooth bead… and a molten reminder that gravity never takes a lunch break.
In this guide, you’ll translate position codes into real setup moves, technique choices, and test-ready habits—especially for 5G pipe welding, where your coupon stays put and your excuses don’t.
Why welding positions matter (quality, safety, and passing tests)
If you can weld flat but fall apart overhead, you don’t have a “bad day”—you have a position gap. Positions affect puddle support, fusion, slag behavior, and defects. They also change your hot-work safety risk profile (falling slag, fire hazards).
What you’ll be able to do after this guide (codes → setup → technique)
You’ll be able to: read weld position codes, pick a sane starting technique, adjust parameters by position, diagnose common defects fast, and approach 5G as repeatable “zones” instead of one panic-loop around the pipe.
Quick definitions (position vs joint type vs process)
- Position = how the weld is oriented to gravity.
- Joint type = fillet vs groove (that’s your letter).
- Process = TIG/GTAW, MIG/GMAW, Stick/SMAW, etc. (each behaves differently out of position).
Welding Position Codes (The Cheat-Sheet You Actually Need)
The number tells the position (1–4 basics)
Think of the number as the “gravity difficulty setting”:
- 1 = Flat
- 2 = Horizontal
- 3 = Vertical
- 4 = Overhead
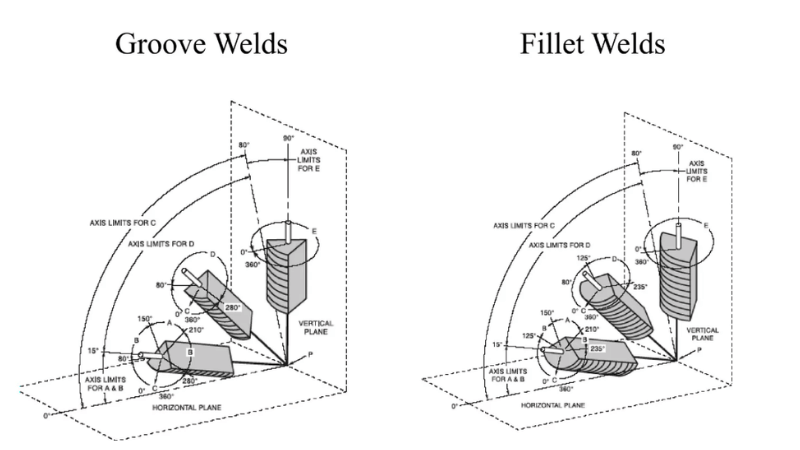
The letter tells the weld type (F vs G)
- F = Fillet weld (T-joints, lap joints—triangle-shaped profile)
- G = Groove weld (butt joints, prepared edges—root and sidewalls matter)
Plate vs pipe: why the same “G” means different setups
On plate, you can often reposition the work. On pipe, the workpiece shape changes where “up/down” is every few inches around the circumference. That’s why pipe gets special test positions like 5G (fixed horizontal pipe).

Mini table: common codes at a glance
| Code | Position | Weld type | What you’re physically welding |
|---|---|---|---|
| 1G | Flat | Groove | Plate butt/groove, flat |
| 2G | Horizontal | Groove | Plate groove, vertical plane |
| 3G | Vertical | Groove | Plate groove, vertical travel |
| 4G | Overhead | Groove | Plate groove, overhead |
| 1F–4F | 1–4 | Fillet | T/Lap fillets in those positions |
The 4 Basic Welding Positions (Flat, Horizontal, Vertical, Overhead)
1G / 1F — Flat position (baseline for settings and technique)
Flat is where you build confidence and baseline settings. The puddle is supported, so your job is consistency—not wrestling physics.
- Start angles (typical): ~10–15° travel angle; work angle depends on joint (often ~45° for fillets).
- Why it’s easiest: puddle sits where you put it, slag behaves, and fusion is easier to see.
2G / 2F — Horizontal position (where sag starts)
Horizontal introduces “the puddle wants to slide downhill” energy.
- Counter sag by slightly reducing puddle size and watching the upper toe (undercut loves living there).
- Horizontal beats repositioning when the part is huge, fixed, or already tacked in a production fit-up.
3G / 3F — Vertical position (up vs down, and when to use each)
Vertical is where welders learn humility… and then learn control.
Vertical-up vs vertical-down decision rules (simple, practical):
- Choose vertical-up for thicker material, better penetration, and stronger fusion control.
- Choose vertical-down when you must limit heat on thin material and the procedure allows it (fast travel, careful fusion).
Bead targets:
- Groove: steady sidewall fusion, controlled reinforcement, no “cold lap.”
- Fillet: even legs, flat-to-slightly convex profile—no undercut at the top toe.
4G / 4F — Overhead position (gravity is the boss)
Overhead is where your puddle tries to become a wearable accessory.
- Strategy: keep heat input controlled and puddle small; faster travel often helps prevent drip.
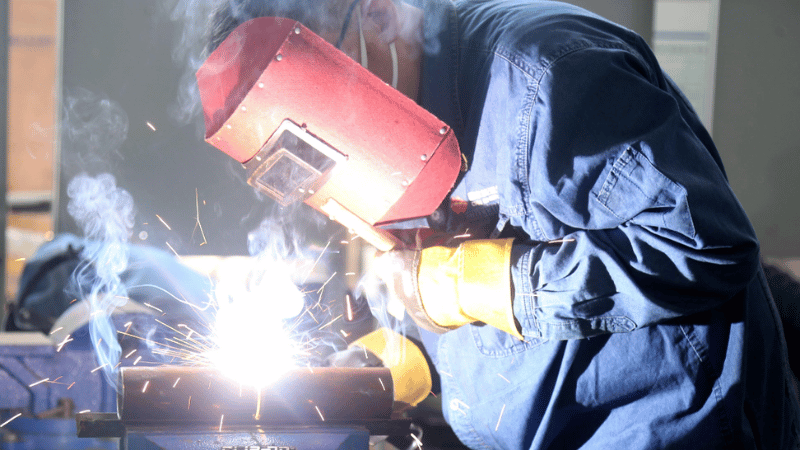
- Safety: overhead welding increases burn/fire risks—use proper PPE, keep combustibles away, and manage sparks/slag. (osha.gov)
Out-of-Position Adjustments (The “What I Do Differently” Playbook)
Parameter changes by position (a practical starting framework)
Here’s the mindset: you’re not “changing everything.” You’re changing what controls puddle size and freeze rate.
If this section runs longer than your attention span, remember one rule: smaller puddle = more controllable puddle.
- Control heat input with a combo of current/voltage and travel speed (depending on process).
- Out of position, aim for a puddle that freezes quickly enough to stay put.
Angle, stickout, and travel direction changes (by position)
Angle is your steering wheel. Stickout is your throttle sensitivity.
- Vertical-up: favor angles that support uphill shelf-building (don’t outrun your puddle).
- Overhead: keep the arc tight and controlled; excessive stickout can make the arc unstable and spattery.
Process feasibility by position (what’s realistic out of position)
Not all processes behave the same when gravity gets petty.
- SMAW (Stick) and GTAW (TIG) are commonly used out of position because you can control the puddle and deposition.
- GMAW (MIG) out of position depends heavily on transfer mode and settings—some modes are far friendlier than others.
Position-by-position defect patterns (quick diagnosis)
Undercut (especially top toe in 2G/3G): too fast + too hot + poor angle control.
Lack of fusion: travel too fast, low heat, or not dwelling on sidewalls.
Overlap / cold lap: puddle too big, travel too slow, wrong angle.
Excessive convexity: deposition too high or travel too slow.
Slag inclusions (SMAW/FCAW): poor cleaning, bad manipulation, or trapping slag at toes.
Practice Progression (How to Build Skill Without Wasting Coupons and Time)
A simple training ladder: 1G → 2G → 3G → 4G
Go in order. Flat teaches repeatability. Horizontal teaches toe control. Vertical teaches heat management. Overhead teaches discipline (and neck flexibility).
Daily drills (10–20 minutes)
- Straight beads: consistent travel speed, consistent arc length.
- Pauses and restarts: practice crater fill and tie-in.
- Edge/Toe tracking: “ride” the toe line without washing past it.
Visual acceptance checklist (before you ever grind or “hope it holds”)
- Bead profile: consistent reinforcement, no random speed bumps.
- Toes: tied-in, no undercut, no overlap.
- Uniformity: consistent width, consistent ripple pattern (process-dependent).
- Craters: filled and blended—no crater cracks waiting to happen.
Advanced Welding Positions (Beyond the Basics, Still Practical)
Why “advanced positions” are mostly “constraints”
“Advanced” often means: restricted access, awkward fit-up, thin-wall, heat-sensitive materials, or limited visibility. In other words: real jobsite conditions.
Restricted access mindset (clearance, visibility, ergonomics)
If your body is unstable, your puddle will be unstable.
- Find bracing points.
- Improve visibility (lighting, lens shade discipline).
- Plan the bead path so you’re not doing yoga mid-weld.
Thin-wall and oxidation-prone materials (stainless/titanium)
For oxidation-prone materials, shielding isn’t optional; it’s the whole game.
- Consider backside shielding (purge) when backside quality/appearance matters, especially on stainless and titanium.
- Poor shielding can cause oxidation/discoloration and degraded weld quality.
5G Welding Explained (Fixed Horizontal Pipe Groove Weld)
What 5G is—and why employers/tests care
5G means the pipe is fixed horizontally and you weld around it without rotating the pipe. You’re forced to weld through multiple gravity zones—exactly why it proves real control.
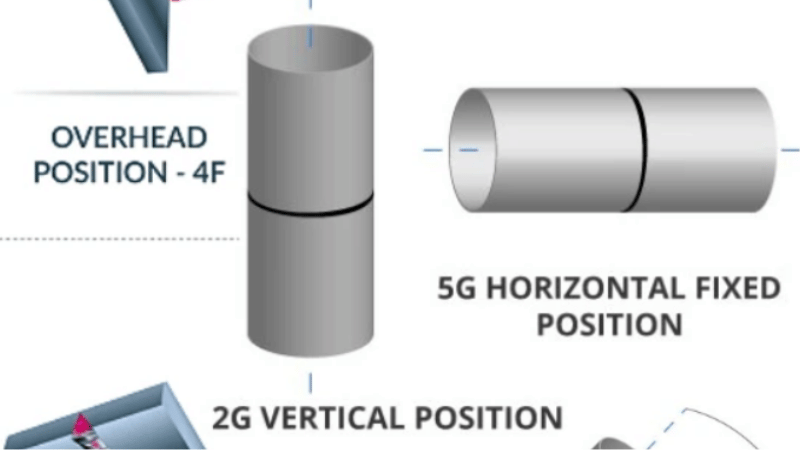
5G setup (the physical arrangement)
- Pipe axis is horizontal.
- Joint is fixed (no rolling).
- You move your body, your torch, your plan—everything except the pipe.
The 5G “segments” you’re actually welding
Stop thinking “one long weld.” Think zones:
- Top zone (near 12 o’clock): puddle wants to sit; heat builds.
- Side zones (around 3 and 9 o’clock): sidewall fusion is the usual failure point.
- Bottom zone (near 6 o’clock): puddle wants to drop; root control matters.
Technique strategy by zone (top → sides → bottom)
Top zone: keep it smooth, don’t overheat early. A hot start can ruin everything later.
Side zones: prioritize sidewall fusion. If you’re failing 5G tests, it’s often here—lack of fusion hides until bend tests expose it.
Bottom zone: maintain control and avoid excessive reinforcement or suck-back/concavity on thinner wall. Keep starts/stops planned—don’t freestyle tie-ins.
Tie-ins and restarts (test reality):
- Clean and feather starts if allowed by procedure/training rules.
- Restart with deliberate fusion into the previous bead edge—no cold “stacking” on top.
Common 5G failure modes + fastest fixes
- Lack of fusion at sidewalls: slow slightly, adjust angle to dwell on sidewall, ensure enough heat for fusion (not just pretty cap).
- Suck-back / concavity (thin wall): reduce heat input, improve root control, avoid overheating at the bottom zone.
- Oxidation (“sugaring”) when purge is needed: improve purge setup, flow discipline, and joint cleanliness before arc-on.
How 5G relates to qualification ranges (high-level, code-aware)
Most code frameworks treat pipe positions distinctly from plate positions, and 5G is used because it demonstrates multi-position control around a fixed joint. Always follow your WPS/test rules for what the qualification covers. (weldingandndt.com)
What Competitor Articles Usually Miss (and What You’ll Learn Here)
Codes-to-actions mapping (not just definitions)
If it’s 3G vertical-up, your first moves usually aren’t “crank the amps.” They’re:
- adjust travel speed, 2) adjust angle, then 3) fine-tune heat input.
A decision framework for “what to change first” when a weld goes bad
Try this order (it’s fast and keeps you honest):
- Travel speed
- Angle / arc length / stickout
- Heat input settings
- Technique (weave/whip/step) only if needed
5G broken into repeatable zones + tie-in strategy (test-focused)
Treat 5G like three mini-welds. Plan tie-ins where you can see, brace, and control. Most failures start as tiny discontinuities at transitions—then bend tests turn them into a very expensive life lesson.
A production-minded bridge from 5G skills to orbital/automation thinking
Manual 5G teaches consistent rotation awareness, shielding discipline, and parameter control—exactly what orbital systems formalize into repeatable production results.
Real-World Field Notes (Experience Section #1)
“What I learned going from flat-only to out-of-position”
Three mistakes caused most rework:
- Oversized puddle (looked “productive,” welded like a disaster).
- Chasing the puddle instead of steering it.
- Ignoring the toes—until undercut showed up like an uninvited guest.
“My first 5G attempt: what surprised me (and what fixed it)”
Surprises: visibility changes constantly, sidewalls are sneaky, and tie-ins are where confidence goes to die. Fixes: better bracing, slower zone transitions, and treating restarts like precision operations—not “just get it going again.”
Position Troubleshooting Clinic (Experience Section #2)
Symptom → likely cause → one change to test
- Undercut: too fast/too hot → slow slightly + adjust angle to support toes.
- Overlap: puddle too big/slow → speed up + tighten puddle size.
- Porosity: contamination/shielding issues → clean better + check gas coverage.
- Lack of fusion: low heat or wrong angle → dwell on sidewalls + stabilize arc length.
- Excess reinforcement: slow travel/high deposition → increase travel speed or reduce fill strategy.
Quick “stop-doing-this” list
- Stop chasing the puddle.
- Stop overheating overhead “because it feels safer.”
- Stop over-weaving in vertical like you’re painting a fence.
Transition to Production: 5G-Level Consistency with MWF-Series All-Position Pipe Welding
When manual 5G skill isn’t enough (repeatability, quality records, throughput)
Manual skill is gold—until you need the same gold bead 500 times, on thin-wall stainless, with traceable parameters. That’s where closed-head orbital welding earns its keep.
What “all-position” means in a closed-head pipe welding context
In a closed-head setup, “all-position” is engineered consistency: enclosed shielding, controlled rotation, and stable parameter delivery—so the process doesn’t drift when the operator blinks.
If you want the broader product family overview, see MWF Series closed-head machines.
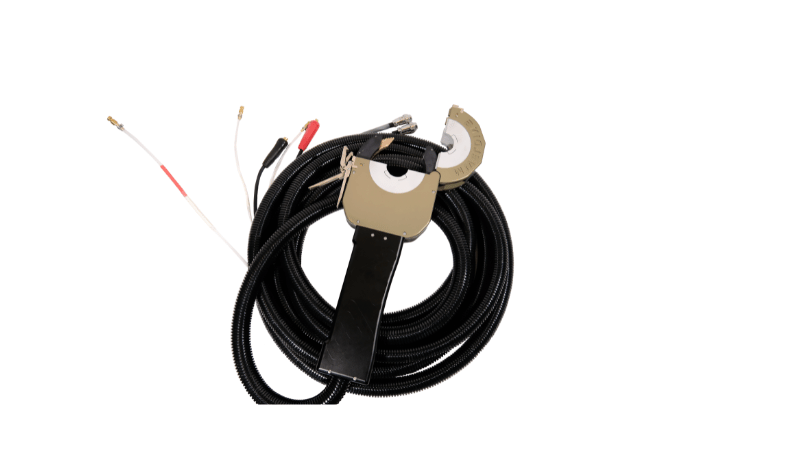
MWF-80 Closed-Head Pipe-to-Pipe Welding System (Overview)
From the technical document: the MWF-80 system is built for industries like electronics, instrumentation, pharma, food, engineering installation, and military applications; it targets thin-wall carbon steel, stainless steel, and titanium alloy with an enclosed, all-position approach.
Key specs that matter for 5G-grade work
Here are the numbers that actually affect results (not brochure poetry):
- Pipe OD range: Φ12.7–Φ76.2 mm
- Wall thickness: 0.8–3 mm
- Rotation speed: 0.15–4.5 rpm
- Shielding gas: argon; plus water-cooling loop for duty-cycle support
For more context on orbital solutions, you can also browse Orbital welding systems.
Fit-up and prep requirements (so the machine can succeed)
Automation is not magic—prep is the spellbook.
- Clearance: keep R=105 mm around pipe center free of obstacles
- Clamp straight length: ≥25 mm for pipe end welding
- Cleanliness: clean 6 mm each side; remove oils/oxides/coatings; wipe with ethanol/acetone
- Alignment: squareness within ±0.5°; mismatch ≤5% wall; ovality ≤5%
- Tacks: ≥2 small tacks; tack diameter ≤Φ3 mm
- Purge note: stainless/titanium needing backside formation must use internal shielding gas
Joint compatibility (what it can/can’t do)
Supports butt joints and various fittings (tee, elbow, reducer) with autogenous welding (no bevel) per the document—but not every connection form (e.g., elbow-to-elbow) is supported.
MWA-200F Integrated Power & control (learn faster)
The MWA-200F control power supply includes a 10-inch touchscreen, step-based UI, parameter zoning (up to 8 sections), storage for 30 parameter sets, and monitoring of current/voltage/rotation speed—plus safety protections (motor overload, water flow/level/temp, tungsten short protection).
Safety + electrical notes
The document emphasizes proper grounding and correct breaker guidance (and warns against certain protective breaker configurations that may trip during operation). Treat this as “non-negotiable boring stuff” that prevents exciting bad outcomes.
Who this solution is for
Best fit:
- High-purity and thin-wall work needing consistent quality, repeatable shielding, and reduced rework.
Not ideal:
- Unsupported joint geometries, extreme site constraints, or jobs where manual access/variation is unavoidable.
Conclusion
Welding position codes are simple—number = position, letter = joint type—but success comes from what you do differently when gravity changes the rules.
Master out-of-position work by controlling puddle size, toe fusion, and heat input strategy. Then treat 5G like zones plus disciplined tie-ins, and you’ll stop “hoping it passes” and start welding like you planned to pass.
Take the Next Step
Built for 5G-Level Consistency, Not “Good Enough” Beads
When your work involves thin-wall stainless/titanium and all-position pipe joints, consistency isn’t a nice-to-have—it’s the difference between clean passes and costly rework. The MWF-series closed-head pipe welding approach focuses on controlled rotation, enclosed shielding, and repeatable parameters—so your results don’t depend on who had coffee that morning.
➡️ Visit iKrtaz Website to See Professional Welding Equipment
Talk to People Who Think in Weld Zones
If you’re juggling 5G-style gravity zones, purge requirements, fit-up tolerances, and production throughput, we’ll help map your real job conditions (pipe OD, wall thickness, material, joint type, clearance) to a safer setup and a more stable weld window—so you hit quality targets without turning every joint into “test day.”
➡️ Submit an Inquiry & Project Specifications Today
Frequently Asked Questions
Q1: What’s the difference between 1G and 1F (and why does the letter matter)?
A: The number indicates the position (1 = flat). The letter indicates weld type: F = fillet, G = groove.
Q2: Is 5G welding harder than 3G/4G?
A: Often, yes—because the pipe is fixed and you weld through multiple gravity zones (top/sides/bottom) in one test. That forces consistent puddle control and solid tie-ins all the way around. (weldingandndt.com)
Q3: For thin-wall stainless pipe, do I always need purge gas on the inside?
A: Not always—but when backside quality is required (to prevent oxidation and achieve backside formation), internal shielding (purge) is commonly needed for oxidation-prone materials like stainless and titanium.
