
A single, seemingly minor flaw in a weld can compromise the integrity of an entire structure, leading to catastrophic failures down the line. For welders, fabricators, and quality control inspectors, understanding how to identify, diagnose, and prevent these defects is not just a skill—it’s a critical responsibility.
Think of this guide as a doctor’s diagnostic manual for your welds. iKratz will show you what the “symptom” looks like, explain the root cause, and provide a clear “treatment plan.” By mastering the art of defect diagnosis, you can elevate your work from merely “acceptable” to truly perfect.
The Four Cornerstones of Defect Prevention
Before we dive into specific defects, let’s establish the foundation. The vast majority of welding issues can be traced back to a failure in one of four key areas. Proactively managing these will prevent most problems before they start.
- Cleanliness: The Golden Rule
This is the most important principle in welding. Contaminants like oil, grease, rust, paint, or even moisture on your base metal or filler material are the primary culprits behind porosity, inclusions, and fusion problems. A few minutes spent on thorough cleaning provides the highest return on investment for weld quality. - Parameters: Dialing It In
Your machine settings are the recipe for a good weld. Amperage (current), voltage, and travel speed must be in perfect harmony for the specific material, thickness, and position you’re working with. Incorrect parameters are a direct cause of everything from undercut and spatter to lack of fusion and burn-through. - Technique: The Human Factor
Proper technique is about control and consistency. This includes maintaining the correct travel angle, work angle, arc length, and a steady travel speed. Poor handling of the welding gun or electrode holder is a classic source of inconsistencies that lead to defects. - Preparation: Setting the Stage
A quality weld begins long before you strike an arc. This involves correct joint design (bevels and root gaps), proper selection of filler materials, and managing the thermal cycle with preheating or post-weld heat treatment (PWHT) when required.
The Welding Defect Diagnostic Manual
Here, we break down 10 of the most common defects. For each one, we follow a simple, three-step process: What it looks like, why it happens, and how to fix it.
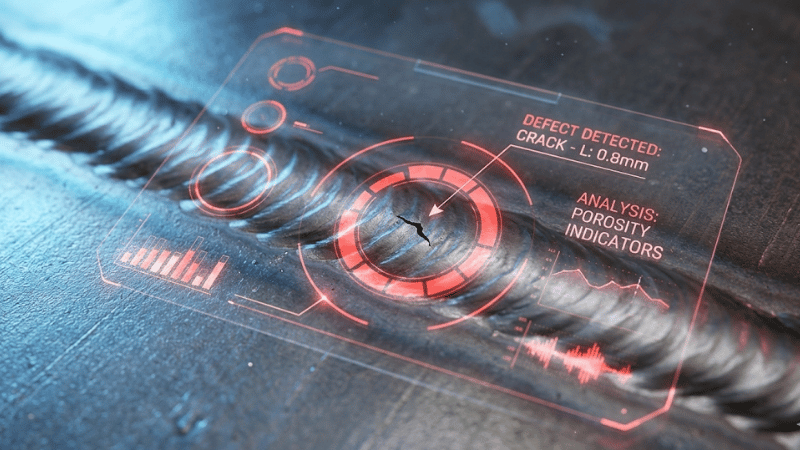
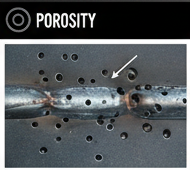
1. Porosity
- A. What It Looks Like:
Small, spherical holes or cavities clustered on the surface or trapped inside the weld bead. It resembles a sponge. - B. Why It Happens:
This defect is caused by gas getting trapped in the molten weld pool as it solidifies.- Inadequate shielding gas coverage (flow rate is too low, or there are drafts).
- Contaminants like oil, rust, paint, or moisture on the base material.
- Using damp or improperly stored consumables (electrodes, filler wire).
- Excessive arc length.
- C. How to Fix It:
- Check your flowmeter and increase the shielding gas flow rate; erect wind barriers if welding outdoors.
- Thoroughly clean the joint surface with a wire brush and a degreasing solvent before welding.
- Store all consumables in a dry environment, and bake electrodes according to manufacturer specifications if they have absorbed moisture.
- Maintain a short, consistent arc length.
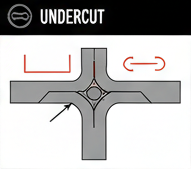
2. Undercut
- A. What It Looks Like:
A sharp groove or notch is melted into the base metal along the toes of the weld. The groove is not filled by the weld metal. - B. Why It Happens:
The arc force essentially “digs” into the parent metal without enough filler metal to fill the space.- Welding current (amperage) is too high.
- Travel speed is too fast.
- Incorrect electrode or gun angle.
- Using an electrode that is too large for the material thickness.
- C. How to Fix It:
- Reduce your amperage and/or slow your travel speed.
- Maintain a proper work angle, typically pointing the arc slightly more towards the thicker plate in a T-joint.
- Use a slight weaving motion to ensure the toes of the weld are adequately filled.
3. Lack of Fusion
- A. What It Looks Like:
A failure of the weld metal to fuse properly with the base metal or with a preceding weld bead. In a cross-section, you can see a clear boundary where the metals haven’t joined. - B. Why It Happens:
This is a “cold” weld problem, meaning there wasn’t enough heat input to achieve proper melting.- Welding current (amperage) is too low.
- Travel speed is too fast.
- Incorrect gun angle, failing to direct the arc at the leading edge of the weld pool.
- The joint is too narrow for the arc to reach the bottom.
- C. How to Fix It:
- Increase the welding current and/or slow your travel speed.
- Direct the arc towards the leading edge of the weld pool, ensuring you’re melting both sides of the joint.
- For multi-pass welds, ensure you completely clean the slag from the previous bead before starting the next one.
4. Cracking
- A. What It Looks Like:
Visible fractures that can appear in the weld metal, in the heat-affected zone (HAZ), or in the base metal. They can be longitudinal, transverse, or crater cracks. - B. Why It Happens:
Cracking occurs when welding-induced stresses exceed the strength of the metal. This can be due to:- Hot Cracking: Occurs at high temperatures, often due to improper filler metal selection or high levels of impurities.
- Cold Cracking: Occurs after the weld has cooled, often due to hydrogen embrittlement, high stresses, and a susceptible microstructure.
- Rapid cooling of the weld area.
- High restraint in the joint, preventing natural contraction.
- C. How to Fix It:
- Apply preheat before welding and post-weld heat treatment (PWHT) after welding to slow the cooling rate.
- Use a low-hydrogen filler material, especially for high-strength steels.
- Design the joint and welding sequence to minimize residual stress.
- Ensure the crater is properly filled at the end of the weld.
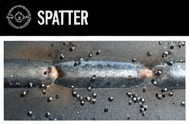
5. Spatter
- A. What It Looks Like:
Small droplets of molten metal that are expelled from the arc and stick to the surface of the workpiece. - B. Why It Happens:
While some spatter is unavoidable in certain processes, excessive spatter indicates a parameter issue.- (MIG/GMAW) Current is too high or voltage is too low.
- (Stick/SMAW) Arc length is too long.
- Incorrect polarity setting.
- Poor gas shielding.
- C. How to Fix It:
- Fine-tune your voltage and amperage settings to achieve a stable, “sizzling bacon” sound in MIG welding.
- Maintain a short and consistent arc length.
- Use anti-spatter spray on the workpiece before welding.
6. Incomplete Penetration
- A. What It Looks Like:
The weld metal fails to extend through the full thickness of the joint. The root of the weld is not fused. - B. Why It Happens:
This is another heat input issue, where the arc fails to reach and melt the bottom of the joint.- Joint design is poor (root gap too small, bevel angle too narrow).
- Amperage is too low, or travel speed is too high.
- Electrode is too large for the joint.
- C. How to Fix It:
- Ensure your joint preparation includes a sufficient root gap.
- Increase your amperage and decrease your travel speed.
- Use a smaller diameter electrode to better access the root of the joint.
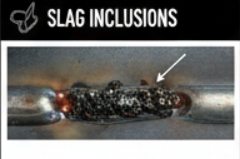
7. Slag Inclusions
- A. What It Looks Like:
Non-metallic slag is trapped within the weld metal. It often appears as irregular lines or isolated pockets. - B. Why It Happens:
This is common in processes that use flux, like Stick (SMAW) and Flux-Cored (FCAW).- Failure to completely clean the slag from a previous weld pass.
- Incorrect welding technique that allows the slag to run ahead of the weld pool.
- The weld pool solidifies too quickly, trapping slag underneath.
- C. How to Fix It:
- Meticulously clean every weld bead with a chipping hammer and wire brush before depositing the next layer.
- Adjust your travel speed and gun angle to keep the arc at the leading edge of the puddle.
- Ensure the weld joint has enough space for the slag to be manipulated and not become trapped.
8. Overlap
- A. What It Looks Like:
The weld metal protrudes over the surface of the base metal at the toe of the weld but does not fuse to it. It looks like the weld is just “sitting on” the plate. - B. Why It Happens:
This is caused by insufficient heat at the edge of the weld pool or by poor technique.- Travel speed is too slow, allowing the weld pool to roll ahead.
- Incorrect work angle, not directing heat to the edge.
- Amperage is too low.
- C. How to Fix It:
- Increase your travel speed.
- Use a work angle that directs the arc force to the toe of the weld.
- Pause slightly at the toes of the weld when using a weaving technique to ensure fusion.
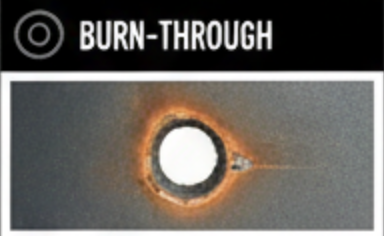
9. Burn-Through
- A. What It Looks Like:
An open hole melted completely through the base material. It’s the result of excessive, uncontrolled heat input. - B. Why It Happens:
This is most common on thin materials or in root passes.- Amperage is excessively high for the material thickness.
- Travel speed is too slow.
- The root gap in the joint is too wide.
- C. How to Fix It:
- Significantly reduce your amperage and/or increase your travel speed.
- Ensure the joint fit-up is tight and consistent.
- Use a smaller diameter electrode or wire.
10. Distortion
- A. What It Looks Like:
The workpiece has warped or changed its shape and dimensions as a result of the heating and cooling cycle of welding. - B. Why It Happens:
The non-uniform heating and cooling of the metal causes it to expand and contract unevenly, inducing stress that pulls it out of shape.- Excessive heat input.
- Poor welding sequence.
- Lack of proper clamping or bracing.
- C. How to Fix It:
- Use only the minimum amount of heat and weld metal necessary for the joint.
- Employ techniques like backstep welding or balanced welding on both sides of a joint.
- Firmly clamp or tack weld the workpiece in place before welding.
- Use heat sinks (copper or aluminum blocks) to draw heat away from the workpiece.
Finding Hidden Flaws: A Quick Intro to NDT
What you can see on the surface is only part of the story. Non-Destructive Testing (NDT) methods are used to inspect for defects without damaging the part. While Visual Testing (VT) is the first line of defense, QC inspectors may use other methods:
- Liquid Penetrant Testing (PT): A colored dye is used to find tiny surface-breaking cracks.
- Magnetic Particle Testing (MT): Iron particles are used to reveal surface and near-surface flaws in ferromagnetic materials.
- Ultrasonic Testing (UT): High-frequency sound waves are sent into the material to detect internal flaws like lack of fusion.
- Radiographic Testing (RT): X-rays or gamma rays are used to create an image of the weld’s internal structure, much like a medical X-ray.
Conclusion
While knowing how to fix defects is a valuable skill, preventing them is the ultimate goal. The vast majority of flaws can be eliminated by mastering the fundamentals: maintaining absolute cleanliness, dialing in the correct parameters, and using proper technique.
By making these principles a habit, you shift from simply repairing mistakes to producing flawless welds from the very start.
Take the Next Step: From Fixing to Flawless
You’ve learned how to diagnose welding defects. Now, it’s time to eliminate them at the source.
Tired of inconsistent results and human error on critical jobs? Automate your process. Discover iKratz Orbital Welding Systems and see how you can achieve perfect, code-quality welds every single time, regardless of operator skill.
Ready to elevate your entire welding operation? This guide helps you spot problems; our technology solves them. Visit iKratz to explore the full spectrum of advanced welding solutions and expert resources that drive productivity and guarantee quality.
Frequently Asked Questions
Q1: Found a defect. Should I just grind it out and reweld?
A: No. Always diagnose before you repair. First, identify the defect type and its root cause (e.g., dirty material, wrong settings). Grinding without fixing the underlying problem will only cause the defect to reappear.
Q2: Are all welding defects equally dangerous?
A: Not at all. A tiny crack can be critical, while minor internal porosity might be acceptable. Defect severity depends on its type, size, and the part’s final use. Official codes, like AWS D1.1, define the clear acceptance standards for different applications.
Q3: What’s the single most important rule to prevent most defects?
A: Keep it clean. The vast majority of defects are caused by contaminants like rust, oil, or moisture. A thoroughly cleaned work surface is the most effective form of prevention.


